Keys To Success
- Work with your LumiLor dealer for support and guidance before you need it on topics such as
- Design
- Application
- Electronics
- Troubleshooting
- Always start with a LumiLor Starter Kit before moving on to a project.
- Use only genuine LumiLor materials.
- Watch LumiLor Training Videos for Starter Kits before starting.
- Never add any solvents, thinners, or other materials to LumiLor.
- Use the LumiLor Calculator to assist with busbar sizing.
- Pay attention to design; it’s a critical part of your success. Plan your complete design before beginning LumiLor application.
- Use the same size inverter when applying LumiLor that you will use on your completed project. This provides consistency in what you see when you apply LumiLor and what you will see on the finished project.
- Document your process at each step - images, videos, notes etc.
- Documenting your projects in detail is an important part of being a successful LumiLor applicator. Photos, videos, and notes of each step are a vital part of troubleshooting if an issue occurs. The more detailed information captured the more detailed support you will receive. Take photos and videos of your design, your application (the actual spraying of each component), and the project after each step.
- Wear nitrile gloves during the entire LumiLor application process to prevent smudges and fingerprints.
- Follow LumiLor on YouTube for new ‘How To LumiLor’ videos.
Steps of the Standard LumiLor Application Process
- Substrate/Material Testing and Preparation
- Design
- Lit area
- Busbar
- Connection areas
- Substrate masking
- Backplane masking
- Backplane application and testing
- Dielectric application
- LumiColor application
- Busbar masking
- Busbar application and testing
- Connector application
- Conductive Top Coat application
- Encapsulating clear application
Your Application Ratio
Keep track of how much of each layer of LumiLor you use relative to other layers. This will help to more easily plan how much LumiLor you will need for projects.
Ratios differ based on factors including application technique, design, product type (CTC is the only water based layer).
Your ratio will be unique to you. Here is an example based on averages from multiple applicators.
- 3 Parts Backplane
- 2 Parts Dielectric
- 2 Parts LumiColor
- 1 Part CTC
LumiLor Design
There are two main approaches depending on what you are trying to accomplish.
You can apply LumiLor to a generic area - a circle, square, or other shape. After that you can block the areas you don't want to illuminate with an opaque paint, vinyl, or other coating.
Or you can create a stencil and apply the LumiLor Stack only to the area to be illuminated.
You can 'paint a wire' from your LumiLor field to the edge of the substrate and even wrap it around to the backside to avoid drilling a hole in your substrate. How to Paint a Wire with LumiLor
Busbar Design
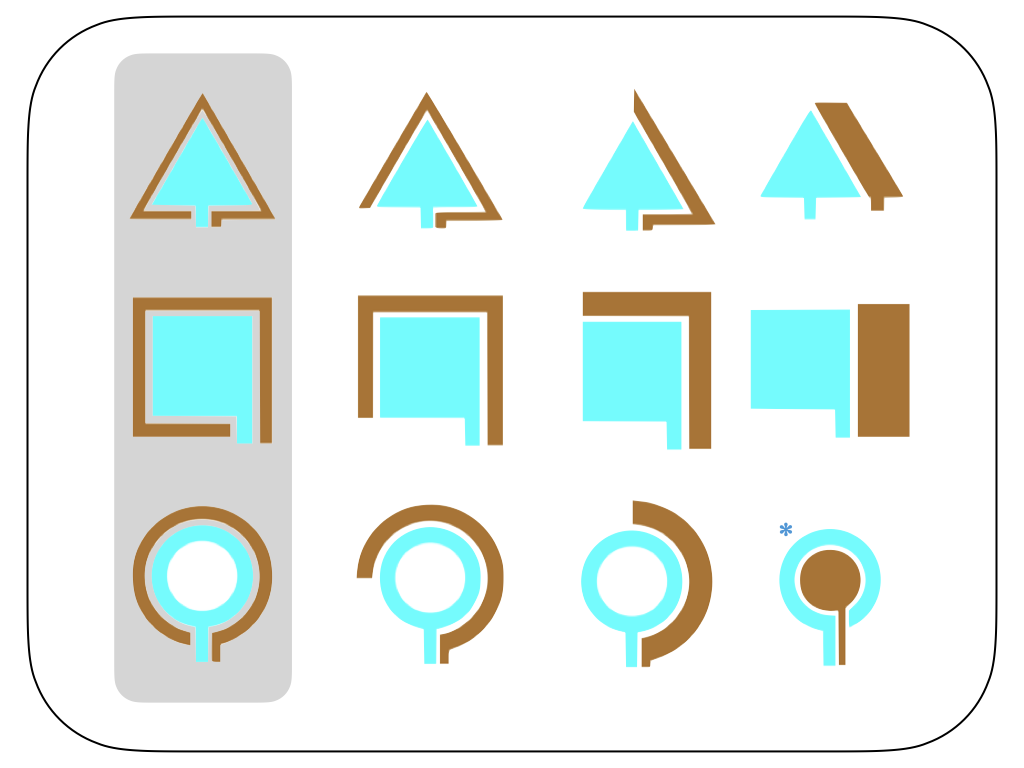
The total area of the busbar must be at least 33% of the total lit area of LumiLor to insure an efficient system.
The ideal design includes a busbar that completely surrounds the entire lit area. This provides the most consistent and uniform electrical field for the lit area.
The busbar must NEVER be applied directly over the Backplane surface area.
In the example designs below, those highlighted with gray background show the ideal busbar layout for that design.
* This busbar design is efficient, but notice that the lit area is not a complete circle like the other versions because the busbar dissects it.