Busbar Overview Videos
Busbar and Backplane
Backplane and Busbar SHOULD NOT be applied at the same time to avoid issues with the integrity of your LumiLor Stack
Video 1 of 2 - All about Busbars
Video 2 of 2 - All about Busbars
Busbar Equipment and Materials
- HVLP system with 1.3mm nozzle and PSI of 20 - 25
- Disposable cup system
- ¼" to ½" masking tape
- Filter - 120 mesh or 125 micron
- Glass or plastic stir sticks (DO NOT use wood or metal stir sticks)
- Properly prepared and masked substrate
- Multimeter
- Some multimeters have pointed prongs which can scratch or dent your Backplane material. To prevent this you can fold a piece of conductive tape over the prong tip or you can purchase rounded prong covers which are easily available online.
Never overlap Backplane and Busbar
The busbar should be applied outside the perimeter of the backplane and it NEVER overlap the backplane. Overlapping backplane and busbar will cause a failure in the LumiLor Stack.
Busbar Masking
- Busbar area should be 33% of the total illuminated area.
- Correct busbar size and shape have a direct impact on the success of LumiLor.
- LumiLor Calculator can help determine size of busbar needed
- LumiLor - Success Starts Here has details about proper busbar design
- Contact your dealer for more information if required
- Cover the backplane including the connection site by taping around the border of the entire area to be illuminated with at least ¼" masking tape.
- Tape should not only cover the backplane but also overlap outside of the backplane by ⅛ to ¼".
- Use application tape or paint mask to cover the entire backplane area that has been taped off.
- Use masking tape to secure the masking paper to the original masking around the backplane.
- Make sure the area around the backplane connector has at least ⅛" around it that is taped so that the busbar does not touch any part of the backplane connector.
Busbar Application Key Points
The busbar uses the backplane material, a solvent based, sprayable, conductive paint.
Backplane material is used for the busbar and it is pre-mixed and ready to spray.
It is a conductive layer that provides a low resistance path for better current distribution with the Conductive Top Coat.
Busbar will be applied within the designated tapped off area an ⅛" around the backplane and will also have a designated area for the second connection site.
The busbar should NEVER overlap any section of the backplane. This will cause a failure in the application.
The busbar will typically have a minimum of two coats but no more than four. Ultimately the ohm reading determines the number of coats. Ohm reading should be between 5-20 ohms when measuring from end to end on each straight side and from the furthest points.
Adjust your spray gun to a more narrow fan pattern when applying the busbar. Also lower your PSI as the pressure will raise when narrowing your fan pattern.
Busbar thickness is approximately 1 mil or 25 microns.
Busbar Application
Step 1 - Mix and Strain
- Thoroughly shake for 1 to 2 minutes
- Mix with glass or plastic stir sticks to insure no solids are at bottom of container
- DO NOT use wood or metal stir sticks
- Shake again as needed
- Strain with 120 mesh or 125 micron filter
Fan Pattern for Busbar
For narrow busbar areas such as those in the LumiLor Starter Kits, tighten your fan pattern so it is more narrow. A wider fan pattern can be used for larger busbar areas.
Step 2 - Apply First Coat
- Apply one medium coat of backplane material to the busbar area.
- Make two extra passes of backplane material at the connection site.
- Dry time of 5 to 10 minutes at 70°F.
Step 3 - Apply Second Coat
- Apply one medium coat of backplane material to the busbar area.
- Make two extra passes of backplane material at the connection site.
- Dry time of 5 to 10 minutes at 70°F.
Step 4 - Test Conductivity
- Once the busbar is complete and has had its proper dry time, check its conductivity with a multimeter in ohm position. Check multiple readings from different locations across the substrate, including points that are the farthest away from each other, for a target reading of 5-20 ohms.
- Wet backplane material will not provide a stable reading, it will jump from low to high back and forth.
- Dry backplane will have a stable reading at a specific number.
- A reading above 20 ohms after the second coat will require a third coat.
- Note - the resistance reading will increase once the tape is removed.
Step 5 - Apply Third Coast if Needed
- Apply one medium coat of backplane material to the busbar area.
- Make two extra passes of backplane material at the connection site.
- Dry time of 5 to 10 minutes at 70°F.
- Retest for conductivity.
Step 6 - Re-test Conductivity
Target ohms reading MUST be achieved. If not repeat the process with another coat until the desired ohms reading is achieved.
Busbar Dry Time, Unused Material, and Clean-up
Wait a minimum of 15-30 minutes and a maximum of 8 - 12 hours before preparing for Conductive Top Coat.
Return unused material to original container after agitated in the spray gun cup.
Clean any used containers and/or spray guns with thinners or acetone immediately after use.
Dry times will vary based on local environmental conditions.
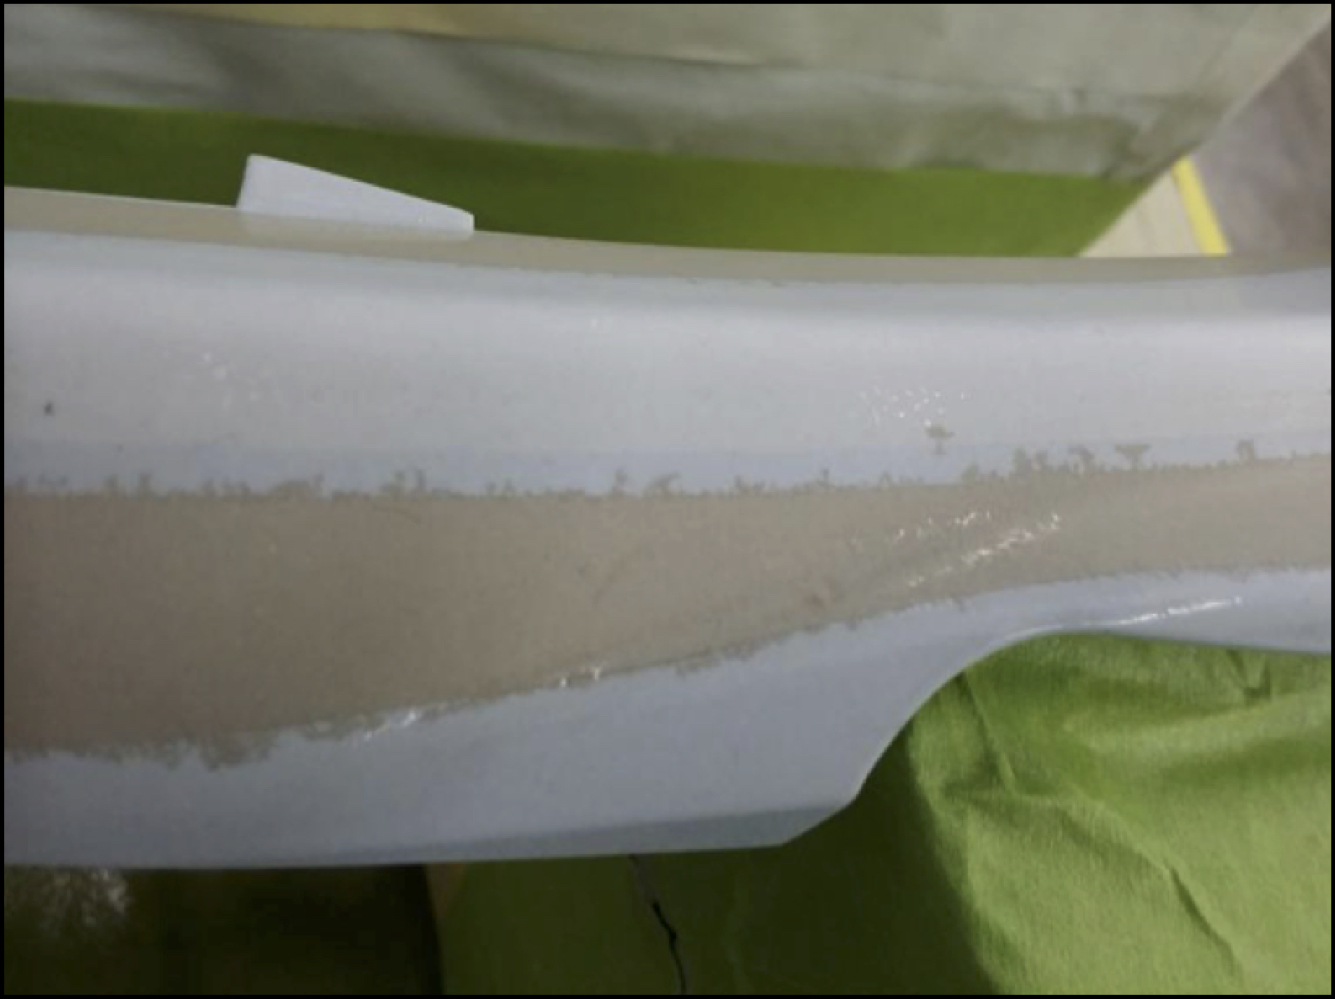
Busbar Visual Reference Guide
Busbar - Bleeding under tape
- Causes - Busbar sprayed too heavy or tape not adhered correctly.
- To Correct This - If busbar bleeding does not come in contact with the backplane this is only a cosmetic issue; no fix needed. If busbar does come in contact with backplane remove the connection point of material.
- To Avoid This - Spray busbar lighter and confirm tape is adhered properly before each coat.